
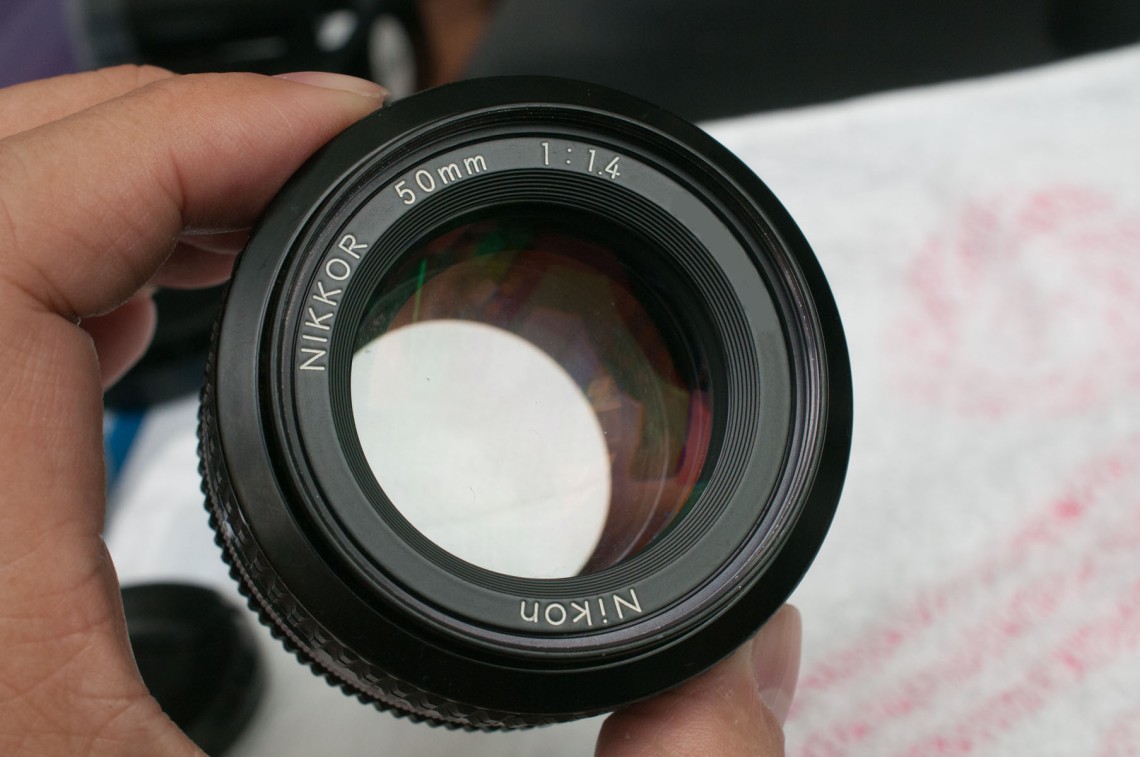
Nikon Df and the cleaned 50mm f/1.4 Ai
Return of an old friend
I have always had fond memories of the days with just the humble standards lens, a Canon FD 50mm f/1.8 SC on Canon AE-1 that I borrowed and used for a good 2 years. The 50mm lens taught me a lot about photography, having large aperture and “normal view” I learned quite a bit of photographic techniques in my formative years.
Sometime in 1986-87, I bought a used 50mm f/1.4 Ai which then became part of a 3-lens combination of 28-50-105 that served me very well for many years. It was later sold, to make way for the AF version of the same lens.
This lens was purchased as a set with an F2S at the local junk yard. The F2S would require the work of my good friend Hilos Camera Repair to bring it back to full specification again.
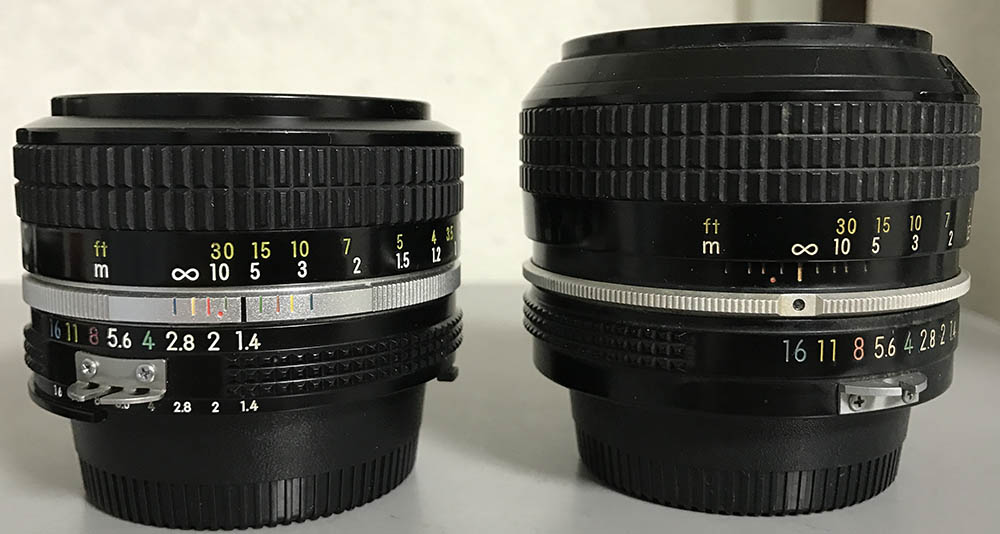
50mm f/1.4 Ai – a lens with character
In a way the f/1.4 normal lens is the flag bearer of many marques, being in the normal lens range (43mm being the diagonal of 35mm film) it is relatively easy to design and built, and is the cheapest f/1.4 lens available for any brand. We do usually have to stop down a stop or 2 to get really good results, but I had often found myself pushed to the f/1.4 limit during my film days. It is often said that all photographers should own a 50/1.4 or 1.8; such is the value of the normal lens.
Optically this lens shares a common design starting with the non-Ai Nikkor K second version (slim), through to the Ai, AiS, AF and AFD versions. Prior designs include the 5.8cm f/1.4, and the 50/1.4 Nikkor-S, SC and K versions. Adding the AFS version there are 4 optical versions of the 50mm f/1.4.
Optical Performance
I am not a brick-wall shooter, not too interested in technical aspects of the lens. So with the Nikon Df in hand, and the cleaned lens, I went out and did some casual shooting for the purpose of showing some day-to-day type of shots.
 Fallen comrade. At f/1.4, there is discernible light falloff (vignette), and softness to the edges, with an adequately sharp centre. Nikon Df, 50mm f/1.4 Ai, 1/250s f/1.4 ISO 100.
 Mural: samsui woman. Samsui women, also known as hong tou jin (红头巾; Mandarin for “red headscarf”) after their trademark red headgear, were female immigrants mainly from the Sanshui (“Samsui” in Cantonese; meaning “three waters”) district of Canton (Guangdong today) province in southern China. Samsui women started arriving in Singapore in large numbers in the mid-1930s and many found work as general labourers in the construction industry. Reference: http://eresources.nlb.gov.sg/infopedia/articles/SIP_795_2005-01-18.html. At f/2, I find the lens adequately sharp and exhibits little light falloff. Nikon Df, 50mm f/1.4 Ai, 1/50 f/2 ISO 2000.
 Mural depicting life in Singapore in the early immigrant days under British rule. You can see the Chinese working as labourers (“Kuli”) and having shaved foreheads and wearing a pigtail, required under Qing Dynasty that ended in 1911-1912. My family arrived here between 1890-1910, no way to know for sure which year. Nikon Df, 50mm f/1.4 Ai, 1/80 f/8 ISO 100.
About me
I am an engineer by training, I enjoy photography, love listening to music, and am addicted to scuba diving; hence the nick diediemustdive. You are here not to read about me, but about the lens I am about to describe, but then you just might be interested to know a little more About Me. Go ahead and click on that link, if you will.
Before we begin…
Disclaimer: all information in this blog is meant for sharing of experience and not as instruction, and is no substitute for diligent learning and assessment of competence. I have messed up my fair share of lenses, and will not be held responsible for any damage caused in the reader’s venture into this fascinating world of mechanical and optical marvel.
You should be conversant with lens repair techniques; beginners should read my earlier blog posts – the Lens Repair series, and Richard Haw’s excellent write-ups (Camera and Lens Repair Essentials, Best Practices (part 1), Best Practices (part 2), Best Practices (part 3) and Working with Helicoids).
Optical and Mechanical Design


Optical Design: 7 elements in 6 groups; the optical unit (OU). Always useful to have the optical design, as it aids reassembly in case the markings get smeared!
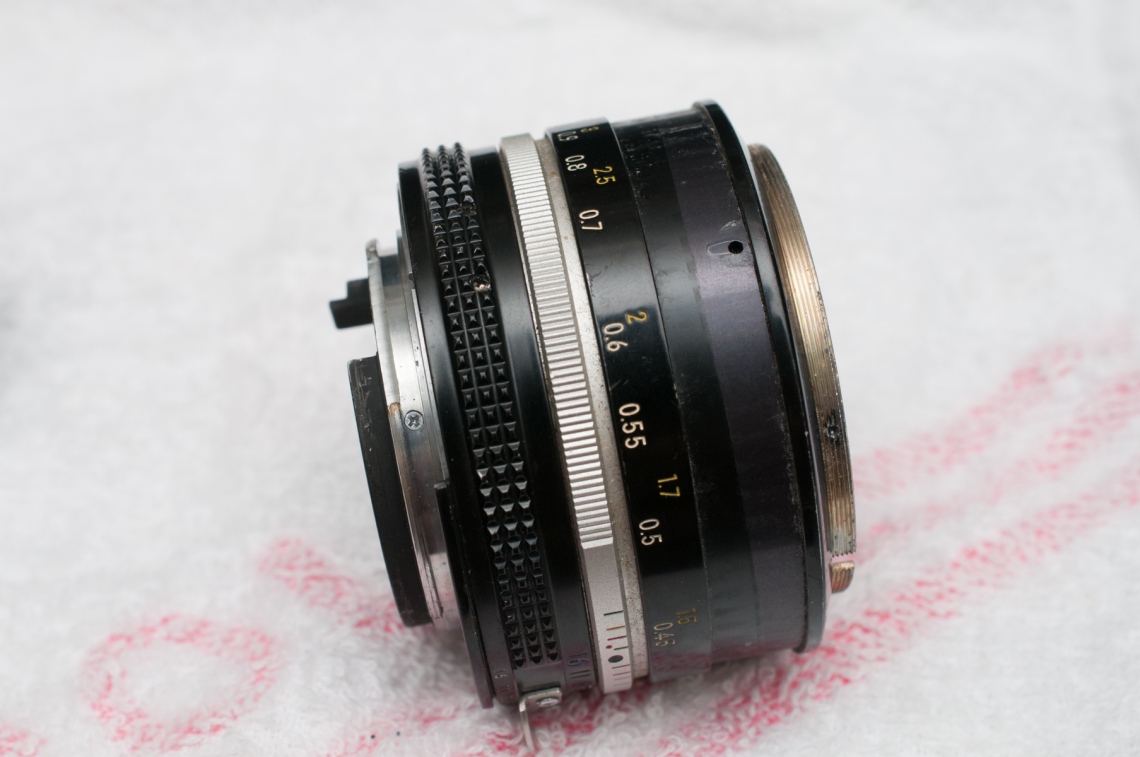
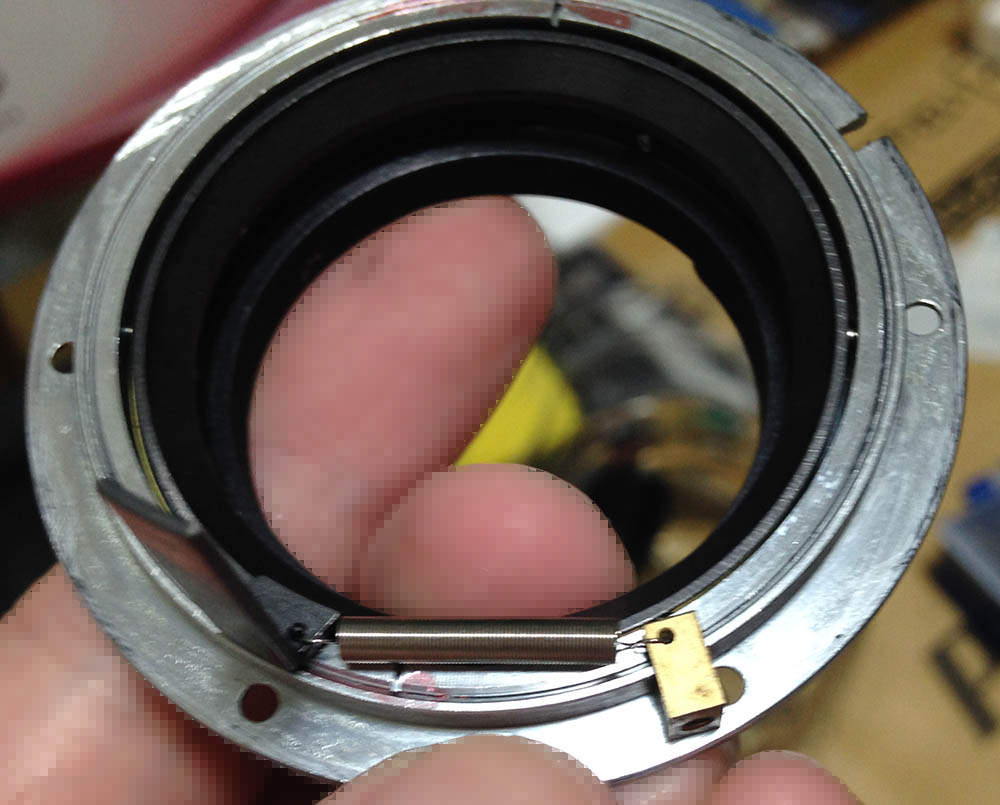
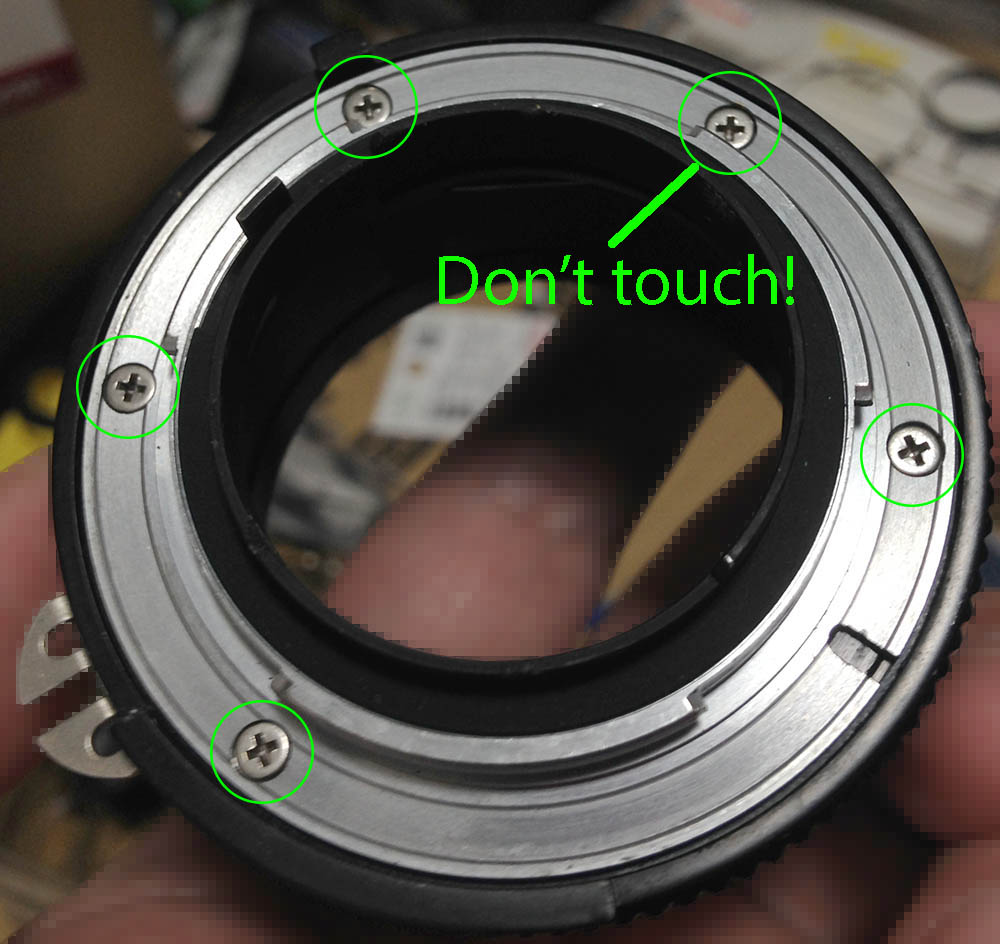
There are mechanically several Ai and 1 AiS versions. This is the final Ai version, with 3(+) bayonet mount screws and 2 aperture ring (AR) aperture coupling screws. The version without the 2 AR aperture coupling screws has a ring with a protruding screw to couple with the AR. See reference (in Japanese – look at the photos). If your lens is without the AR aperture coupling screws, you will need to work around this and not follow this post strictly when working around the AR. The pre-Ai versions have a spring at one of the screws at the mount – which is not a mount screw and that screw should not be removed. I believe the clue to this is the index being a line rather than a circle. The first K version (much “fatter” lens) also has this screw and spring, as did the Nikkor-S version.
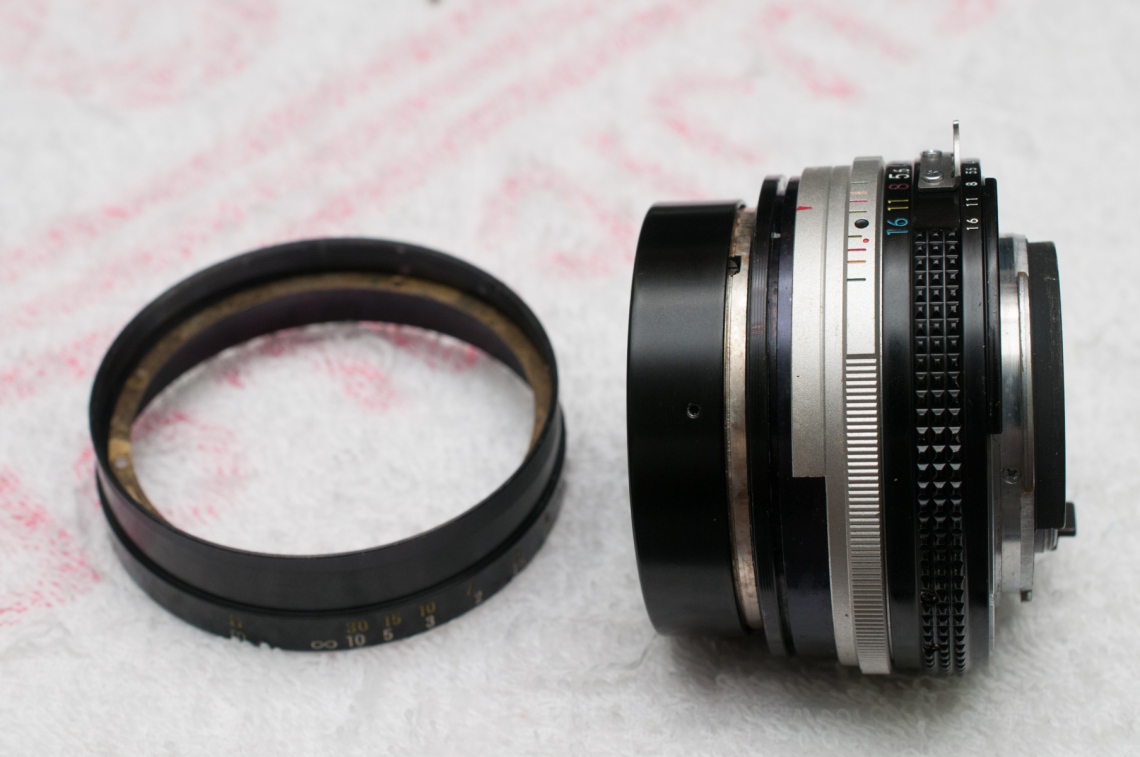
Mechanically, the lens main components are (coming from the front, and inside out): OU retainer, OU, OU helicoid, focusing ring (FR) helicoid, barrel (with helicoid), FR cover, FR, chrome grip, aperture ring (AR), bayonet mount.
 OU retainer, OU and the lens body. Note the slot on the OU helicoid and the screw – they form the alignment between the OU and the OU helicoid. Just within sight at the bottom is the OU aperture coupling lever – the position of which must be marked in this version of the lens in order to return the OU back to the body.
I was not able to find an exploded diagram for this lens. Although I did find one for the 50mm f/1.4 AiS, the mechanical construction is too different to be of any use.
Disassembly – Mechanical Components
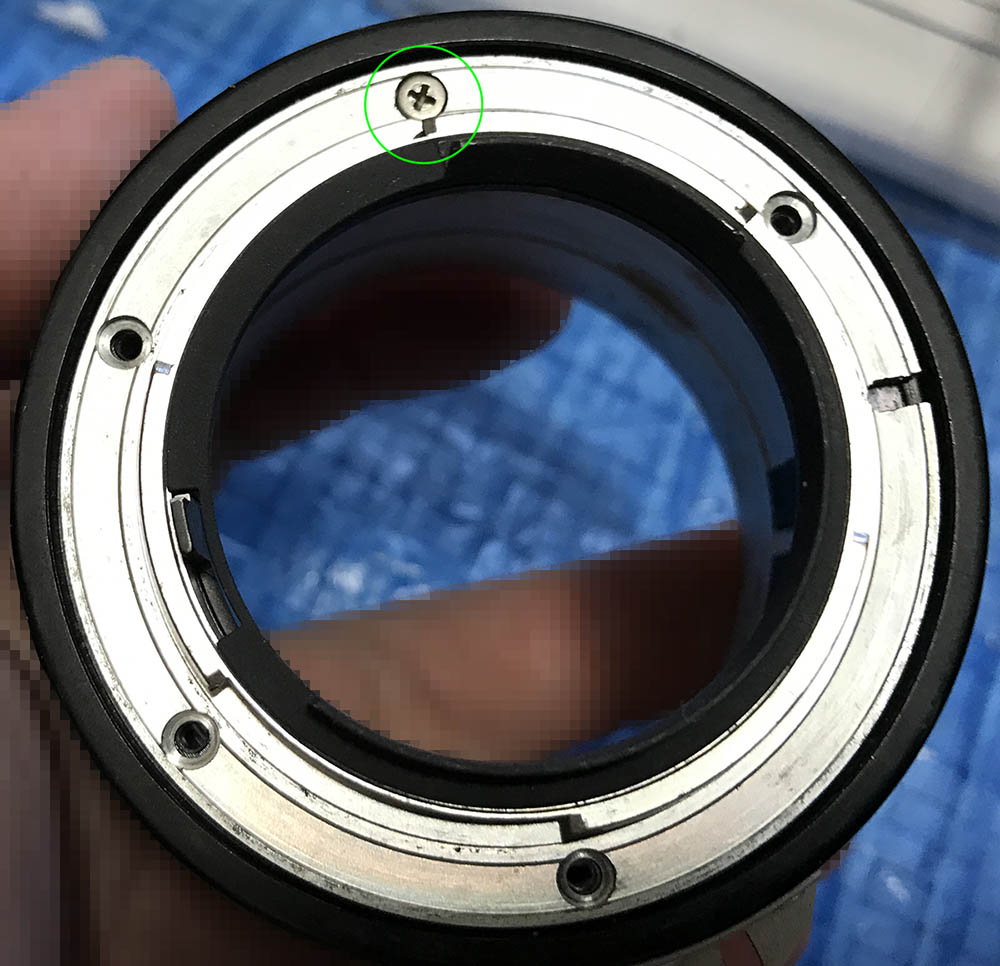
 Set aperture at f/16, focus at MFD, and locate set screw. Remove set screw and unscrew the OU retainer.
 Gently tab the lens and the OU should slide out.
In the Ai version with 3 (+) bayonet mount screws and 2 AR coupling screws (as in this example), immediately mark the position of the aperture coupling on the OU. Set the OU aside for later optical cleaning. If you have no mechanical or aperture issues, you can skip to the optical cleaning part of this post.
 Remove the 3 (or 5) screws holding the bayonet mount. My experience has been there is at least one screw with thread-lock applied. I fear this screw, for I have had rounded quite a few screws in my time. The use of JIS screwdrivers is essential – make sure the screwdriver fits the screw tightly, so that when force is applied the screwdriver head will not slip! Proceed with firm downward force while attempting to turn the screws; and at the first sign of significant resistant desist. Acetone treatment is then necessary. My friend David can simply apply firm down force and provide sufficient torque to break the thread-lock; I can’t.
 In this version of the lens there are 2 screws holding the aperture coupling to the AR. In the other version, I think, the AR can be lifted up immediately. There is then a ring that couples with the aperture lever.

The AR aperture coupling lever. Press this with your fingers while removing the 2 screws. Remove the AR.
 Gently remove the rubber grip to access the FR cover. This rubber is likely to be brittle and it is easy to rip it! I ripped this one; first one thus far.
 Locate the drip hole and apply a few drops of alcohol into the hole, wait a short while (maybe a min), and with friction grip gloves, remove the FR cover.
 There is a shim with 3 screws holding the FR to the FR helicoid. The broad piece of dark coloured metal is the helicoid key.
Note: photos below were taken after servicing was completed. My initial disassembly was less organized, and I had to trial and error to find the correct alignment of the helicoids.
Important: if you have to work with the helicoid, and you see a blog post that has no description on the alignment marking, be very weary as failure to note how the helicoids separate/couple will result in endless trial and error to find the correct point of coupling!
Take several photos at this and at every stage, you may need them to figure out the alignment. I had to use the early photographs to do just this, and the adjustment process was very painful!
To recap, with the helicoid key in place the OU helicoid moves the OU in and out on the optical axis without rotating the OU when the FR is turned. The FR couples with the FR helicoid via 3 small screws and a shim. The chrome grip part extended towards the front (see photo below) is the stopper in the present case – look at the focusing ring and you will see on the inside there is a small part that will stop the FR at both infinity and MFD. There needs to be a barrel helicoid to let the FR rotate helicoid in the barrel. This way the filter ring will not turn; a simpler design will have a pair of helicoid, with focusing ring coupling to the OU helicoid, and the OU helicoid will rotate in the barrel helicoid. That way the filter ring will turn, as in most zoom lenses and a few prime lenses. See my posts on 36-72/3.5 E and 80-200/4.5 C for examples.
 Turn FR to infinity, remove the 3 screws and then the FR. Mark the infinity positions of the OU helicoid (inner most tube), FR helicoid (black ring) and infinity on the barrel helicoid. Remove the helicoid key (2 screws on the barrel). This frees up the OU helicoid. Ensuring that the FR is not moved, rotate the OU helicoid counter-clockwise (CCW, blue arrow in photo above), count the number of turns, and watch for the point of separation, mark point of separation. Rotate the FR CW (red arrow), count the number of turns and watch for the point of separation, mark point separation. These points of separation is where you will re-couple the helicoids.
 From left (photo not in the usual orientation – now front is to the right!): barrel body with helicoid (chrome grip attached), FR helicoid and OU helicoid. The grease on the helicoids had dried up / gummed up and the FR was beyond stiff! After separating them (and removing the chrome grip) the helicoids were cleaned using lighter fluid.
 The complete disassembly (OU intact here, AU and the rear mount assembly (ball-bearings included!) not disassembled).
Optical Cleaning
The optical unit (OU 7/6), comprising the front OU (3/3), aperture unit (AU) and rear optical unit (4/3).
 Front view: fungus is evident. Remove the name plate (which acts as retainer to E01) with a rubber tool, then open the retainer to the front OU with a lens spanner.
 Mark orientation!
 Name plate, E01, front OU, AU.
 Side view of the front OU; hole indicating that alcohol may be necessary to remove this retainer, which turned out to be the case for E03.
 Front OU completely disassembled. Top row: name plate, E01. Bottom row: front OU casing, E02, and E03 and rear retainer. I proceeded to clean E03, then E02, return E02 and E03 to the casing, then E01, and close up the front OU with the name plate. Hydrogen peroxide to kill the fungus, the clean with alcohol, both from a local pharmacy.
 E02: I was told this type of “frosty” mould would destroy the coating, and sure enough on close inspection after cleaning there were coating impacts.
 Rear view of OU. It is clear that the fungus has infected internal elements as well. The “hairy” mould is less damaging.
 Apply a few drops of alcohol into rear OU holes and at the adhesive mark area, and unscrew the rear OU from the OU casing. Two slots on the front view of the rear casing – use lens spanner to open the retainer, set E04/E05 aside.
 Internal view of E06: another pair of slots to open up the retainers using lens spanner. E07 is within the rear OU case. Again the same procedure, clean E07, then E06, place E06 back into case and tighten retainer, clean E04/E05, place E04/E05 back into case and tighten retainer. Return rear OU back into casing.
There was no problem with the aperture blades, so I left the AU alone.
Re-assembly
Re-assembly essentially followed the reverse procedure.
- Return FR helicoid to the lens barrel – align at the separation point and return the FR helicoid to the barrel helicoid, to the marked infinity position
- Return OU helicoid to the lens barrel – as above align separation point, turn to marked infinity position
- Fix the helicoid key

- Return the AR to the lens barrel, fix the AR aperture coupler
- Return the bayonet mount to the lens
- Carefully set the alignment of the OU aperture coupler to the marked position and return the OU to the lens (cleaning of the optics assumed completed, see optical cleaning section). This step can be very tricky for the 2-screw AR coupler version.
- Return the OU retainer to the lens
- Adjust for infinity focus
- Remove the OU retainer, and reattach the FR, then the OU retainer
Note: I had removed without getting all the separation marks done correctly, I had to trial and error to get the helicoids aligned.
Adjust for infinity by the process below.
 Adjusting for infinity focus: attach everything except the FR, and attach the lens to a camera. Rotate the FR helicoid to get infinity focus, then re-attach the FR base on this position. You will likely want to remove the OU retainer when re-attaching the FR (space to work the screws). Be careful when the OU retainer is out – you can drop the entire OU and have a very expensive accident!
The lens after cleaning
 Not too bad!
Conclusions
As anticipated, this lens was relatively easy to service, even though I did have some reservation about going to the helicoid, especially in this case where the almost stuck helicoid made it difficult to mark alignment. But having played with helicoid alignments a few times with various zoom lenses, a Yashica 50mm f/2 ML and a Ricoh 50mm f/2 XR, I had some practise and was able to navigate through this lens. The focus is now smooth, but not buttery smooth, as I did not do a very thorough helicoid clean-up. Someday I may!
I have thoroughly enjoyed disassembling, cleaning and reassembling this lens, and am enjoying the company of an old friend. Most of all, rescuing a lens from the junk yard and restoring it to as close to its former glory as I could, is satisfying. What was imperfect? Some coating damage, and helicoid smooth but not buttery smooth.
References
50mm f/1.4 Ai – focus on the helicoids with good photos to illustrate process for 3+ screws 2 AR aperture coupling screw version, with a photo to show the version without the coupling screws, in Japanese Aiニッコール50mmF1.4の分解 http://www17.plala.or.jp/rec-c/sub3.html
50mm f/1.4 Ai – complete disassembly – with good photos to illustrate process, in Japanese 修理人たぐちの徒然日記 Ai NIKKOR 50/1.4 編 http://www.kitamura.jp/photo/repairer/2013/re940.html
50mm f/1.4 Ai – optical part only, in Japanese, Ai NIKKOR 50mm F1.4 分解清掃 http://dracame.exblog.jp/20900193/
50mm f/1.4 Ai – Cleaning aperture blades レンズの分解清掃 – http://www.geocities.jp/pxm0/nikkor50mm.htm
50mm f/1.4 Ai – Nikon NIKKOR 50mm 1:1.4 Cleaningしてみたよ (Youtube) https://www.youtube.com/watch?v=1xLSVCIChLU
50mm f1.4 Ai partial disassembly to show the difference between the “usual” construction of the 50mm f/1.4 Ai and the 2 AR aperture coupling screws version), in Japanese. Ai Nikkor 50mm F1.4の内部構造が違っていた件 http://gossan.cocolog-nifty.com/blog/2010/02/ai-nikkor-5014n.html
50mm f1.4 Ai Disassembly (erroneously labeled as AiS, version with 2 AR aperture coupling screws, same as my blog post, also omitted helicoid alignment part – dangerous to follow this blog!) – dehk – https://dehk.wordpress.com/2011/02/01/ais-nikkor-50mm-f1-4-disassembly/

This is impressively detailed. I have the same lens and have been wondering about adjusting the infinity focus stop since the lens doesn’t focus all the way to infinity. Is there a way to do this without having to remove the OU?
LikeLike
Hi Kaew,
Thank you for your kind words.
You do not need to remove the OU to adjust infinity. First step is to turn the lens to infinity and note or estimate how far the actual focus point is.
Proceed to remove the rubber grip carefully (without ripping it), then remove the focusing ring cover (may not be very easy to remove – need solvent and a good grip on the lens).
At this point you can see the shim and the FR screws (3 of them). If you can loosen the FR screws now, then you don’t need to remove the OU retainer (which is also the collar with filter ring). If you can’t loosen the FR screws now, then you need to remove the OU retainer.
After loosening (not remove) the FR screws, turn your focusing to the distance you have previously determined (the actual focus point), then tighten the FR screws. You lens should be almost adjusted to infinity, now repeat the focus at infinity mark on lens and estimate actual focus distance, loosen, turn FR, tighten. Or over adjust so that FR goes beyond infinity, then loosen the FR screws, turn FR to infinity, tighten.
Hope this helps.
LikeLike
Thank you so much, for the reply. I’ll try this and let you know.
LikeLike
It’s now bang on!! Thank you so much.
LikeLike
Hi, Do i need to disassemble the whole lens to clean just rear lens? if not, what steps should i follow? thank you!
LikeLike
No you do not need to disassemble the whole lens to clean the rear elements. There are 2 possible approaches: (1) follow what I do until you get the whole optical unit out from the front, then move to cleaning the elements and start from the rear, just clean what you need to; (2) come from the rear mount, remove the bayonet mount and then follow the steps to remove only the rear OU, leaving rest of OU within the lens. If I only need to clean the rear element I would do the second approach.
LikeLike
Great stuff! Keep up with the helpful tips! 🙂
LikeLike
Robert Cassidy (https://cassidyphotography.net) wrote:
Hello,
Reading your website regarding the Nikom 50mm f/1.4Ai, with interest.
I have a Mint Condition Nikon 50mm f/1.4AiS, that I have had for maybe 20 years.
One day, I opened my Dehumidifying Box, where all my lenses and cameras are stored to discover oil of the Aperture Blades. The only lens out of at least 25 like this. Disappointing, because the lens has been a great performer and is so clean.
Brought it to a camera shop, reputation and only game in town, who I had left the lens with for 2 weeks, who called to tell me to disassemble the lens for service, they would have to drill two small holes through the Front Cover Plate with “Nikon Nikkor 50mm 1:1.4 serial number” engraved. I told them “NO!” I have the lens in original condition and they looked very disappointed that I declined their service. I remarked that when Nikon designed and assembled the lens, they did not have to drill holes, which would risk scratching the front element, would allow dust and moisture to enter. The Service Technician was not impressed.
You mention a “rubber tool” in your article. What rubber tool? The tool cannot come in contact with the front lens element, at all. So, what was used?
Thanks,
Robert
Hi Robert,
Quite certainly there is no need to drill holes to remove the name plate or anything at the front.
See https://www.youtube.com/watch?v=XqKFSThFbMo for a youtube video on how to remove the front. Essentially turn the lens to MFD (minimum focus distance) and you will see a set screw on the barrel that is extended (3:00). Remove that set screw then unscrew the filter ring. It seems (from the video, I don’t have the 50/1.4 AiS) the front is opened using a lens spanner, with two slots for coupling with the spanner (3:53). The cleaning of the aperture blades can be tricky, and the installation is more tricky.
The lens tool I talked about is either this: https://www.amazon.com/Sizes-Lens-Filter-Wrench-Rubber/dp/B00988D1BK or this https://www.amazon.com/Japan-Vacuum-Camera-Opener-Repair/dp/B0013HFYKK/ref=sr_1_1?s=electronics&ie=UTF8&qid=1537256833&sr=1-1&keywords=japan+hobby+tool+rubber&dpID=413ogJ62YML&preST=_SX300_QL70_&dpSrc=srch.
Good luck.
LikeLike
Thank you for such a super detailed post!
I have been looking into restoring my father’s lenses back into shape and unfortunately all 3 of them have fungus growing in them.
This seemed like the easiest lens to tackle and also thankfully the other 2 isn’t that bad
so I decided to dismantle this one (Also because I don’t have any specialized tools) I unscrewed the rear screw on the mount plate (Made sure I wasn’t stripping anything or applying too much force as I believe they aren’t exactly Phillips screws) I was able to unscrew the rear part of the optical unit only to find out the fungus is growing on the insides of the lens and not the outside.
Knowing I don’t have the right tools and I drew the line, cleaned what I can from the outside and put it back together. On hindsight I could have dissolved the glue like thing using some 70% alcohol but I don’t think I could have unscrewed it without the specialised spanner.
One day I’ll get my hands on one those and would love to see my dad lens look all shiney clear again, plus the bokeh balls not looking like some kind of microscope view of bacteria is a bonus too.
LikeLike
Hi there ….
Well done on servicing your Nikkor 50mm f1.4 lens! – it is always going to be a learning curve, and an adventure into the unknown, but you got there!
I’ve found that isopropyl alcohol didn’t work in clearing the fungus from the inside of the front element (Nikkor AI 50mm f1.8 lens), but H2O2 (Hydrogen Peroxide) at 6% dilution was fine – to my surprise and delight.
Yes, calibrating the lens for infinity focusing is a process of trial and error, I too tackled it from the front by nailing the infinity (from digital Nikons … hope they are correct!?) then setting the infinity marker at its stop-end and moving very carefully the large outer washer ‘in line’ with the new reference point, then carefully returning the screws. Took about 3-4 attempts.
Good to know others are sharing their experiences.
regards
Eric.
LikeLike
There is a way to adjust for infinity “correctly” using some collimator setup. But I simply use the out-of-the-window far enough point adjustment process outlined above. Either digitally or using a film camera.
Thanks for writing. Glad you enjoyed the write-up.
FG
LikeLike
Hi great post ,i have strpped acoupleof these down with partial succes , i,m stuck on splitting the 2 rear elements to remove the fungus ,there are 2 notches in the lens group do you have any recommendation tools or technique ,thanks
LikeLike
I hope I understand your question correctly – use one of these: https://www.amazon.com/Neewer-Professional-Spanner-Repairing-Stainless/dp/B00J5F73GA/ref=sr_1_3?keywords=lens+spanner&qid=1563087522&s=gateway&sr=8-3
https://www.amazon.com/Neewer-Camera-Lens-Openning-Repairing/dp/B0734PH87W/ref=sxin_3_ac_d_pm?keywords=lens+spanner&pd_rd_i=B0734PH87W&pd_rd_r=a4470a3b-da14-47d9-a933-77cd1b671f36&pd_rd_w=dqg3l&pd_rd_wg=EjeFr&pf_rd_p=64aaff2e-3b89-4fee-a107-2469ecbc5733&pf_rd_r=H81WCPE2PEEA32EWETD0&qid=1563087581&s=gateway
https://www.amazon.com/Japan-hobby-tool-Opener-Camera/dp/B0014Y4K16/ref=sxin_3_ac_d_pm?keywords=lens+spanner&pd_rd_i=B0014Y4K16&pd_rd_r=870da6bc-280d-4e9c-8894-b3301325cad3&pd_rd_w=JAyFY&pd_rd_wg=0PqOP&pf_rd_p=64aaff2e-3b89-4fee-a107-2469ecbc5733&pf_rd_r=8DZ3PHBX46WAR6DJARTK&qid=1563087618&s=gateway
LikeLike
I can disassembly but when assembling it, the aperture blade can not open wide complately, the aperture number in f1.4 but the blade seems look in f1.7
LikeLike